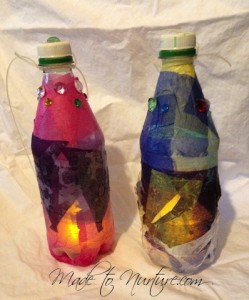
DIY Lanterns/Luminaires
There are so many ways you can make lanterns. For the past 3 years, I have made lanterns with students at various elementary schools for our community’s annual Light, Water, Drum festival. Previous to this I had made lanterns with toddlers and preschoolers in the arts and crafts classes I have taught. And because we have quite a few lantern festivals that occur in our city, I have made a variety of lanterns with my own children over the past 12 years.
There are some really simple ways to make lanterns, and some more difficult ways. Today we will look at making some easy to make, recycled, plastic container lanterns.
PLASTIC CONTAINER LANTERNS
These lanterns are one of my favorite to make, as they are safe (not breakable like glass), easy to make, encourages reusing recyclables, and look fantastic!
You can make these lanterns out of any clear or opaque plastic container. Plastic milk jugs, water/juice/pop bottles, plastic peanut butter jars, plastic condiment bottles, etc. If you live in a rainy city like I do, you may want to consider a container that has a cap on it.
What you’ll need:
A clear plastic container
Tissue paper
Glue
Water
String or ribbon
Embellishments such as stickers, plastic gems, glitter glue
Modge Podge (optional)
Paintbrush
Bowl or yogurt container with lid Scissors
Box cutter
Electronic Tea light
**Make sure you use electronic Tea lights for these lanterns, as real candles will melt the plastic!**
1) Mix 2 parts glue to 1 part water. You can mix it in a bowl, or put it in a yogurt container, put the lid on and shake it up (saves you from spills and is super quick and easy).
2) Cut the tissue paper into squares or different shapes are really cool too.
3) Prepare the bottle. Using box cutters, you’ll need to cut a “flap” on the side near the bottom of the bottle.
4) If the container you used doesn’t have an already made handle, you’ll have to attach a string, ribbon, or pipe cleaner to create a handle. If you are using string or ribbon, make a slip knot on each end. Take the cap off the top of the container and tighten both ends of the string/ribbon on the top or wrap and twist if using pipe cleaner. Tighten the lid back on.
5) Now’s time for the fun part! Get Creative! You can start sticking stickers on the container first (if you want a shadow effect), or stick them on after.
Using a paintbrush or paint sponge, brush some of the glue mixture onto the plastic container, then start sticking on pieces of tissue paper.
After the first layer, brush on some more of the glue mixture. Add another layer of tissue paper and brush on more glue mixture. It’s best to only put two or three layers on the lantern.
The following is optional: instead of brushing on the glue mixture over the final layer of tissue paper, brush on some modge podge.
6) Stick on some embellishments of your choice. And then let your lantern dry.
7) Stick in the electronic tea light, close the flap and… Voila! You have a fabulous lantern that will last for years to come
Here are some photos of lanterns made by some of the students I’ve worked with (the glue has not dried yet)


These are great! I will have to share this craft with a youth group I know.
Thanks for your comment, Gina. I hope they have fun making them.
That looks like fun 🙂
They’re fun to make and look really pretty when lit up at night too.
Thanks for your comment 🙂
What a great DIY! I know my kids will enjoy doing this.
Hope you enjoy making them with your kids 🙂
Thanks for commenting!
This is a cool project. I can hardly wait until my grandson is old enough to start doing things like this. He’s only 6 months old now, so I’ve got a while to wait. Thanks for sharing!
Thanks for your comment. Making lanterns/luminaries are fun and so pretty when lit up at night. My kids love them 🙂
Comments are closed.